This article was last updated on April 16, 2022
Canada: ![]() Oye! Times readers Get FREE $30 to spend on Amazon, Walmart…
Oye! Times readers Get FREE $30 to spend on Amazon, Walmart…
USA: ![]() Oye! Times readers Get FREE $30 to spend on Amazon, Walmart…
Oye! Times readers Get FREE $30 to spend on Amazon, Walmart…
Whether or not you’re heading to Coachella this weekend (or next), there’s no reason you can’t score the signature boho style the festival is famous for. If flowered headbands and face paint aren’t your bag, why not let your inner hippie run wild in a slightly more low-key way? Of course, we mean free-spirited fingernails.
Here, NYC-based nail artist Julie Kandalec shows you how to create three fierce, festival-approved nail art designs: A Feathered Flock, Sunset Palms, and Neon Tribal. Trust, you’ll have a much easier time with these DIYs than you will with, say, keeping cool in the desert heat.

A Feathered Flock
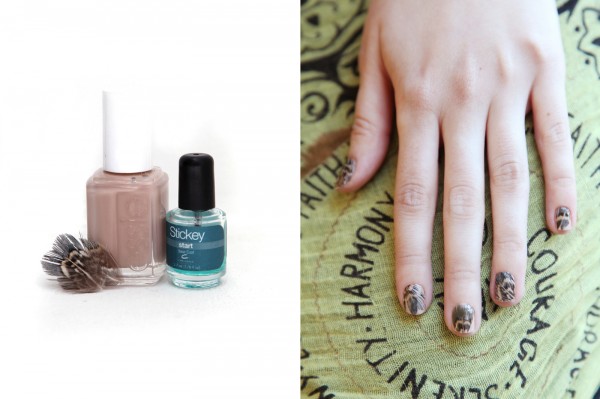
For these textured tips you’ll need some craft-store feathers, an opaque nude polish a couple of shades darker than your skin tone, and a really thick base coat. You should also have an orangewood stick, tweezers, and pair of cuticle trimmers on hand to help with the placement of the feathers.

Julie says it’s easiest to do this one nail at a time, as a lot of this particular design depends on layering over top of wet or semi-dry polish. Start off by painting your nails with the nude nail polish. Let dry, then apply a thick layer of the base coat on top. You want it to be sticky, but not gloppy. Julie says it’s important to use a base coat for this because a top coat will dry too quickly and won’t grab the feather adequately.

Use the tweezers to pick up a feather and lay it gently on the nail, with the end tips of it laying just at your nail bed. Take your orangewood stick and lightly tap the feather, so that all the bits and pieces attach to the still-wet base coat. Don’t press down too hard or it will smudge the polish and make it look all gloppy. Let dry, then use the cuticle trimmers to cut off any excess. Finish with two coats of top coat, making sure to apply it in the direction of the feather. This will help prevent any bunching or separation.

We may have said nay to the fuzzy Cookie Monster mani, but this is a textured look we can totally get behind.

Sunset Palms
Nothing says music festival in the desert quite like palm trees against the backdrop of a technicolor sunset. Okay, maybe not, but this is a pretty damn cool design, so go with it. You’re going to need a black nail-art polish and sheer polishes in shades of yellow, orange, and pink.

Julie says the key here is to mix up the order of the polishes as you apply them, so none of the nails look exactly the same. Start off with your yellow polish and apply it to one-third of the nail: the tip, nail bed, or the side. You don’t want the edges of the polish to be perfect, so be sure to pull down the brush as you apply, to create a messy end. Do the same thing with the orange polish, mixing up the placement, then fill in any of the blank spots on your nails with the pink. The colors should look like they are bleeding into each other.

Grab your nail-art polish and draw the “trunk” of your palm tree. It should be thicker at the base, so start your line there and then pull it toward the center of the nail, making it thinner as you go. Starting at the center of the nail, where your trunk ended, use the nail art brush to create five palm “fronds.”

It’s vacation in a manicure! Mix things up and keep it unique by doubling up on palm trees on two of the nails and leaving two other nails tree-free, or go full-on fronds and add palms to each digit.

Neon Tribal
This patchwork pattern is a little more advanced, but the results are well worth the extra effort. You’ll need nail polishes in aqua, orange, fuchsia, white, black, yellow, and green (whew!), plus a nail-art brush and an orangewood stick for the detail work.

Start off by painting all of your nails with the aqua polish. Use a nail-art brush to paint a thick fuchsia stripe down the center of each nail. Dip your nail-art brush in the green polish and paint three or four (depending on how many fit) evenly-spaced, diagonal lines on the left side of each nail.

Use the nail-art brush to paint four horizontal yellow lines on the right side of each nail. Once the stripes have dried, take the nail-art brush and dip it in white polish and use it to outline the top and bottom edges of the green lines, and the left side of the pink stripe.

Outline the top and bottom edges of the yellow lines and the right side of the pink stripe with black polish. Take an orangewood stick and dip it in the orange polish, then lightly apply small dots on the pink stripe going down the center of the nail.

Patchwork, tribal, abstract — we’re not really sure what to call this, other than a mesmerizing work of art.
Photographed by Laura Miller
Click HERE to read more from Refinery29.

Be the first to comment