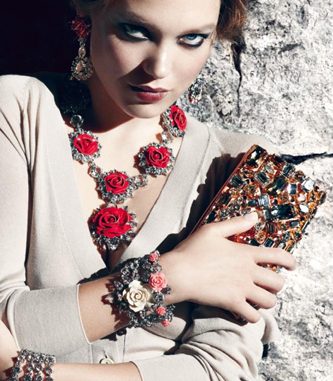
When we first spied Prada’s resort ’12 campaign, our eyes went right to a certain jewel-encrusted clutch that looks like it came straight out of the treasure room in the royal palace. Sadly, since our bank accounts are a little emptier than Will’s and Kate’s, we decided to make our own version of this blinged-out bag for next to nothing. In fact, this DIY is the perfect way to turn an old clutch or a worn vintage hand-me-down into something new and impossibly chic — all you’ll need are some acrylic gems, a few dabs of glue, and a little bit of time (we’re talking under an hour, here). Oh, and if you want to tell your friends you picked it up at some pricy boutique, don’t worry: Your secret is safe with us.

When we spied this Prada ad, we knew we had to figure out a way to recreate that bejeweled clutch for way less.

…and recreate it we did! By using an old clutch, some acrylic gemstones, and a little glue, we turned a plain evening staple into something totally boutique-worthy.

Here’s what you’ll need:
A clutch bag, either new, vintage, or an old one you’d like to revamp
E-6000 adhesive, available in craft stores or online
Make sure that you have a well-ventilated area to use this glue.
Acrylic gemstones in several different shapes, sizes, and colors, available in craft stores or online
A sturdy but disposable work surface, such as an old piece of cardboard or wood

Step 1 — Place the clutch onto your disposable work surface — the E-6000 adhesive is extremely strong, and you’ll have a really hard time getting it off your table if it drips. Remember to also keep a window open while doing this project, as the smell of the adhesive isn’t pleasant.

Step 2 — Take the largest gemstones you have and position them on the bag. Don’t glue anything on right now, as you will likely need to adjust the gems later on.

Step 3 — Next, place the second largest gemstones onto the bag, spacing out the different colors and shapes as you like. We spaced our gems randomly, but we think it would also look cool if you placed them in a pattern.

Step 4 — Add the medium-sized gems to your bag and space them out to your liking, making sure that there aren’t too many gems of one color, size, or shape in any particular area.

Step 5 — Lastly, add the smallest gems to your bag, filling in the gaps between the larger ones. This may cause you to rearrange some of the gems you’ve already laid down, which is why it’s important not to glue them on right away.

Step 6 — Once you have all of the gemstones positioned on your clutch, take a step back and make sure that everything is placed where you would like it to be before you begin the gluing process.

Step 7 — Starting at the bottom righthand corner of the clutch, pick up a gemstone and add a few small dabs of the adhesive onto the back. Don’t add too much, as the adhesive can sometimes ruin the foil backing on the gem.
Tip: Before you start to glue, put a little vaseline on the nozzle of the E-6000 tube. This way, you can later easily remove any glue that has dripped onto the nozzle, which will ensure that the cap won’t accidentally get glued onto the tube after you’re all done.

Step 8 — Place the gemstone onto the clutch and press down firmly, to ensure that the glue bonds well to the fabric of the clutch, and to ensure that the gem doesn’t slide.

Step 9 — As you begin to glue from the right side of the clutch to the left, you may find yourself needing to reposition some of the gems. Feel free to do this as much as necessary, as the spacing and concentration of the gems will likely change slightly during the gluing process.

Step 10 — When you get to the left side of the clutch, again, make any final adjustments in the placement and spacing of the gemstones. You may need to add a small or larger one at the very end, depending on how the position of the gems has changed as you glued.

Step 11 — Once all of the gems have been glued on, allow to dry overnight before you take your bag out for a spin. Voila, you now have the perfect evening clutch that’s guaranteed to get your loads of where-did-you-get-that’s.
Article by Lisa Eppich,
DIY by Christy Kurtz
Photographed by Shanita Sims
Click HERE to read more from Refinery29.

Be the first to comment