If your old data and settings are backed up, a clean install can be faster and better in the long run
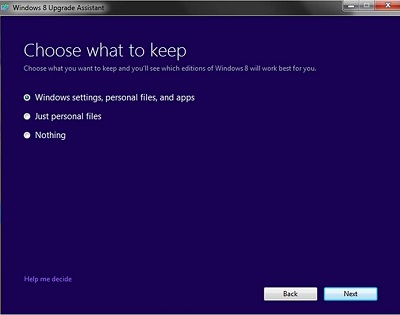
While it is tempting to want to save your data, programs and settings during an upgrade, a clean installation of Windows 8 Pro is often better.
This week I installed Windows 8 Pro twice on the same computer.
The second clean install worked best.
The first time the upgrade was run from within Windows. The automatic setting was ”…keep just personal files.”
It took 3 hours to finish the upgrade. Afterward the computer didn’t seem to work smoothly.
Then I rebooted the computer from the DVD and did a Custom install that wiped the C:\ boot drive and it was complete in 20 minutes. The clean upgrade was the best one.
Improving the performance of old computers
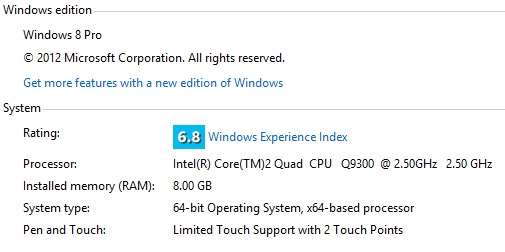
The Custom Upgrade to Windows 8 Pro went very quickly on my 5-year-old computer. This old Dell now has a Windows Experience Rating (WER) of 6.8, with a possible maximum of 9.9.
The same computer only got 5.4 Windows Experience Rating in March of 2012 running Vista. That is a 1.5 point improvement from the upgrade to Windows 8.
However, some users are reporting lower ratings with Windows 8 upgrades.
The Hardware
The Windows 8 Pro upgrade was done on a five-year-old Dell computer. A previous upgrade of this Dell XPS630i from Windows XP to Vista killed the Dell for anything important. It was so slow that it was mothballed two years ago.
- Intel Q9300 Core 2 Quad CPU @ 2.5 GHz4
- 8 GB RAM
- NVIDIA GeForce 9800 GT video card
- 120 GB Intel SSD drive
- 649 GB Western Digital drive
Windows 8 has given the old box a tune up and I plan to use it as my second workstation.
Getting Ready with backup and keys
Before any upgrade is started, all the user data must be backed up. If you have two drives, the non-boot drive is a safe place to store another copy of your data. It does not get wiped in the process, unless you make a mistake. An external USB drive like a Western Digital 2 TB MyBook ($150 at Costco) is a quick place to backup your files.
For software on media, make sure you have the originals with the keys, which are usually on the box. For downloaded software, at least have the software authorization keys.
I like to store mine in a copy protected Excel spreadsheet stored on the web.
32 Bit or 64 Bit Windows 8
If your memory is limited, stick with the 32-bit version of Windows 8. Otherwise, install the 64 bit upgrade to Windows 8.
Automatic Upgrade to Windows 8 Pro from Vista
The computer was running Windows 8 Release Preview on a base copy of Windows Vista.
The upgrade checks the hardware to see if it’s compatible with Windows 8 and to see if the computer has a valid activated license to Windows XP SP3, Vista or Windows 7.
“If you want to run Windows 8 on your PC, here’s what it takes (according to Microsoft):
- Processor: 1 gigahertz (GHz) or faster with support for PAE, NX, and SSE2
- RAM: 1 gigabyte (GB) (32-bit) or 2 GB (64-bit)
- Hard disk space: 16 GB (32-bit) or 20 GB (64-bit)
- Graphics card: Microsoft DirectX 9 graphics device with WDDM driver”
Realistically you need 4 GB of RAM and at least 100 GB of free space on your drive.
Insert the Windows 8 Pro upgrade in the DVD drive and the upgrade runs automatically. If it doesn’t, simple open File Explorer and run the Setup commend from the disk.
- Windows Setup starts, asking you to select the language, time and keyboard.
- The next screen is Windows 8 – Install Now. There is another choice for Repair.
- Enter the product key to activate Windows – in the DVD cover slot. Don’t worry about uppercase or dashes.
- License Agreement – accept
- After the Upgrade Assistant chugged away for 3 hours, it booted Windows 8 with a few issues.
The Upgrade Assistant ignored the SSD drive and installed Windows 8 Pro on the slower but larger Western Digital drive.
The automatic upgrade changed my user account from c:users\sdpate to c:\users\stephen. The data didn’t really get saved in the correct subdirectory.
I had to copy it back unto the new users subdirectory. Not all the files would copy. The operating system cab fail to copy all hidden system and data files from the old profile.
Custom upgrade of Windows 8
To custom upgrade Windows 8 Pro, boot the computer from the DVD drive with the Windows 8 Pro Upgrade DVD in the drive.
You might have to trick your computer to see the DVD drive as a boot device. On this computer, Press F12 during a cold boot or restart to change the boot drive, then Hit any key to boot from the DVD.
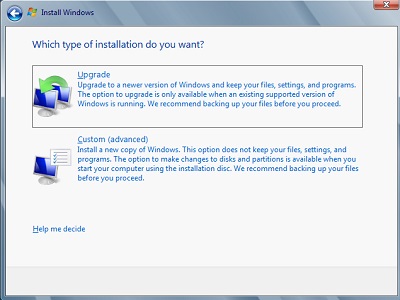
After steps 1 to 4 (above) the next screen is Which Type of Installation do you want
Chose Custom which will allow you to select the drive to be formatted and renamed as C:\, your boot drive.
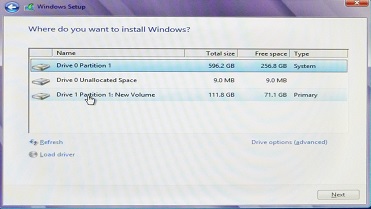
The drives on the next screen don’t have labels like C:\.
Pick the hard drive you want for the boot drive by by size.
I knew that the 120 GB (formatted 111.8 GB) smaller drive was the SSD designated for C:\ and Windows. I selected it with the mouse and hit Next.
After that, the Upgrade Advisor does it’s work automatically:
- – Copies the windows files
- – Expands the files
- – Installs features
- – Installs updates
- – Completes and finalizes the install.
Soon Windows will ask you to personalize the computer with colors, the name of the computer and your Microsoft account email address.
Accept the standard installation choices for now. They can be changed later.
Voila! The next thing Windows 8 Pro will show the welcome splash screen and you’re almost finished. Total time for the custom upgrade is about 30 – 60 minutes.
After login and password, the fun begins.
Take time to explore the Windows 8 interface.
Then the job of installing software and restoring data files begins.
| USA | Canada |
|---|---|
| USA | Canada |
| Other versions of Windows 8 available. Windows 8 Professional System Builder DVD 64-Bit ; Microsoft Windows 8 Pro Pack (Win 8 to Win 8 Pro Upgrade) |


Be the first to comment